Showing posts with label Google App Engine. Show all posts

Wednesday, November 3, 2010

Building a Store Locator type Google Maps app over GAE, using iFreeTools

Our free CRM app over Google App Engine and our online database application builder now support geo-location features and integrate well with Google Maps.

For iFreeTools CRM, we have added the geo-location features to all records which have address values. So, you could now store and search for Leads, Contacts, Accounts and Vendors based on geo-location criteria and view them in a map view based on Google Maps.

iFreeTools Creator, which is our online app builder, also supports the geo-location features.

In this blog post, we will walk-through the steps in creating a simple store locator type application using iFreeTools Creator, to showcase the geo-location and Google Maps integration features.

We will also upload a sample CSV file, reusing a CSV file from Google's tutorial on building a similar store locator type app (that tutorial, by the way, details about building such an app using PHP and MySQL).

The overall steps involved are as given below..
  1. Login into iFreeTools Creator.
  2. Edit App Settings to change the time-zone and branding. (optional)
  3. Create Entity (or "table") to represent Stores.
  4. Create Attributes (or "fields"/"columns") for the Entity.
  5. Start using the app.
    1. Uploading data from sample CSV file. (optional)
    2. Create custom views to filter based on geo-location . (optional)

Step 1 : Login into iFreeTools Creator

This is simple. No sign-up forms. Just login using your Google user account or your Google Apps user account into iFreeTools Creator.

Step 2 : Edit App Settings to change the time-zone and branding. (optional)

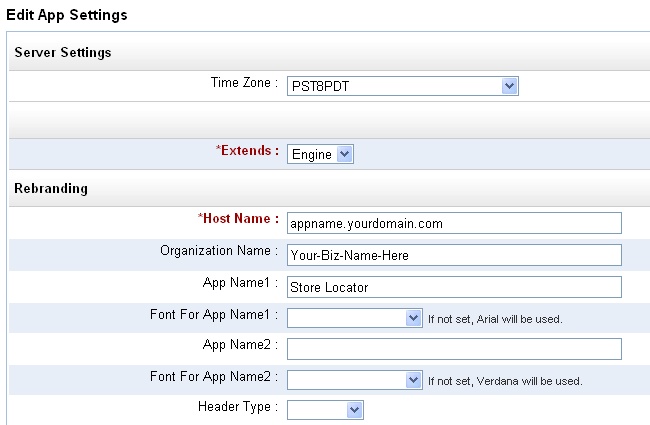
You can re-brand & customize your app from under Admin > App Settings, providing your time-zone and also change the app names from their defaults. The below image shows the changes I have made : choosing PST8PDT as the time-zone and changing the app name to Store Locator.

Step 3 : Create Entity (or "table") to represent Stores

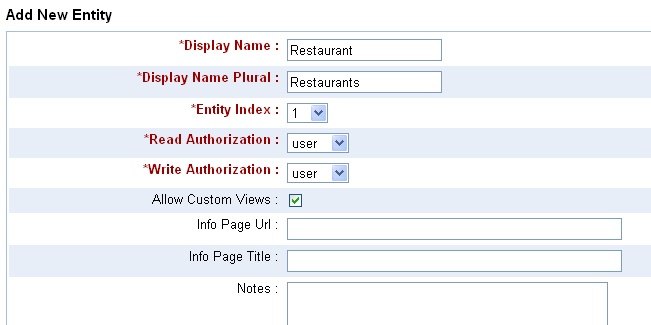
Proceed to Admin > Entities > Add Entity and provide details of the entity which will hold our data. Let us call the entity Restaurant..

Step 4 : Create Attributes (or "fields"/"columns") for the Entity

Once you add the entity, you can then add the attributes for that entity - either from the Entity details page, which you get after completing step 3 or from Admin > Attributes > More Actions > Add multiple Attributes to add them in one shot. For our demo we will use 3 attributes Name, Address and Address on Map, the first 2 being string (or text input fields) while the 3rd is a GeoPoint, which enables us to refer to a specific location on a map and store that value in the database..
The Property Index helps in specifying the order of the attributes. Name comes first, followed by Address and 3rd is Address on Map.

Step 5 : Start using the app

That is it !!
You could just start using the app, adding restaurant entries using the automatically generated form, as shown below..


Step 5.1 : Uploading data from sample CSV file. (optional)

We will now try to upload a sample CSV file. Save this sample CSV file to your disk and edit it to add the column headers, which for this CSV file are..
Name,Address,Latitude,Longitude


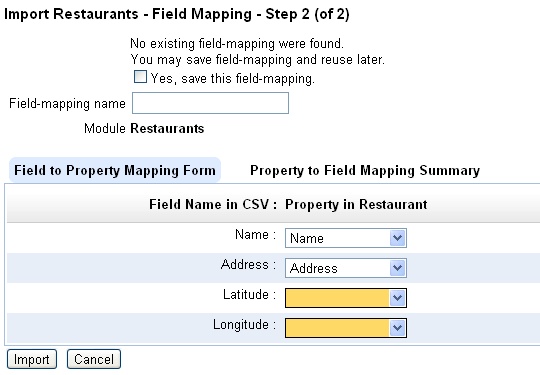
Now proceed to import this CSV file from Restaurants > More Actions > Import from CSV and provide the CSV file and proceed to mapping of fields. The initial mapping will be something like given below..

Now provide the mapping for the latitude and longitude, with both being mapped to Address on Map attribute..
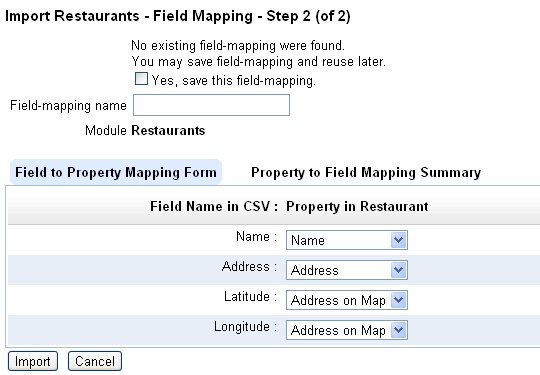

The reverse mapping shows that both the latitude and longitude fields will be combined together for the geo-location value to be stored in Address on Map attribute..
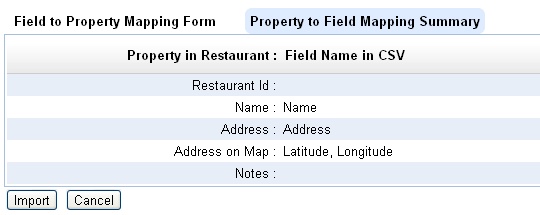

Proceed to import all data into the database. The resulting list view after upload will be like given below..


And the map view (when you click on the View Map link below the table list) will be like given below..


Step 5.2 : Create custom views to filter based on geo-location . (optional)

You can also create multiple custom views to filter data based on nearness criteria.

For example, following are the entries to create a custom view to find stores near Miami Beach, Florida..
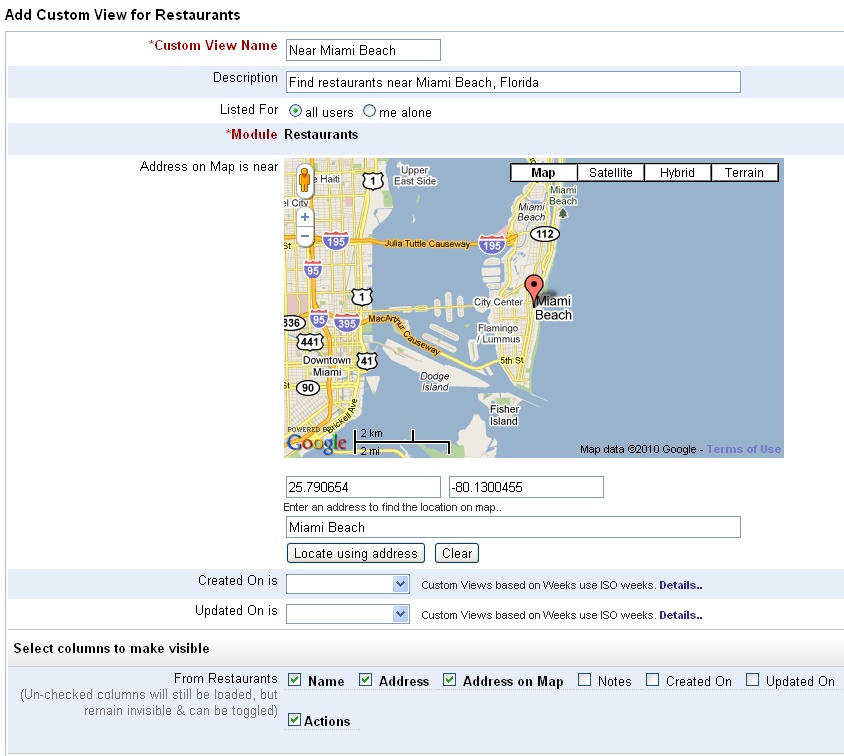
One can provide an approximate address and automatically have the marker placed in that location. Also notice that I have modified the columns that are to be displayed in the list view.

After saving the view, the resultant list view will be something like given below, with the records sorted based on the nearness to the location we specified when creating the custom view (that is, near Miami Beach, Florida)..
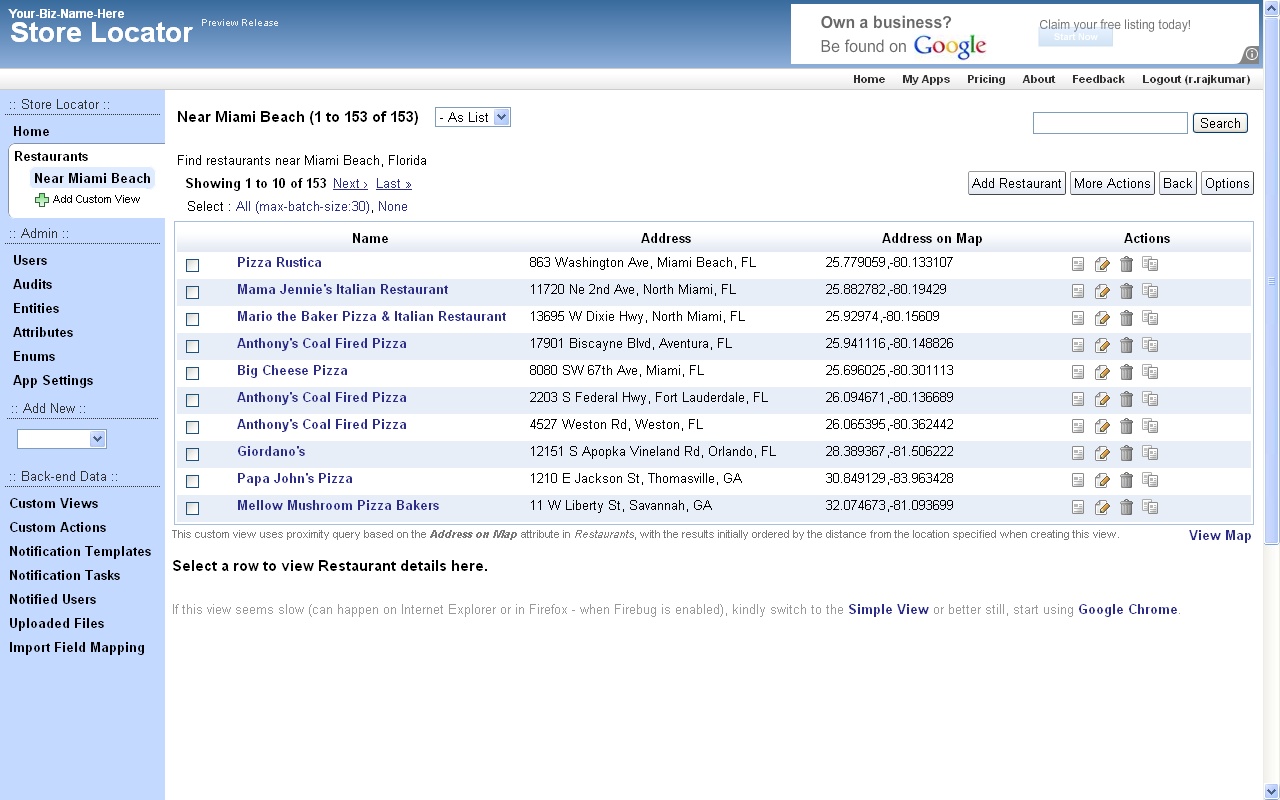

And the corresponding map view will be like the one given below..
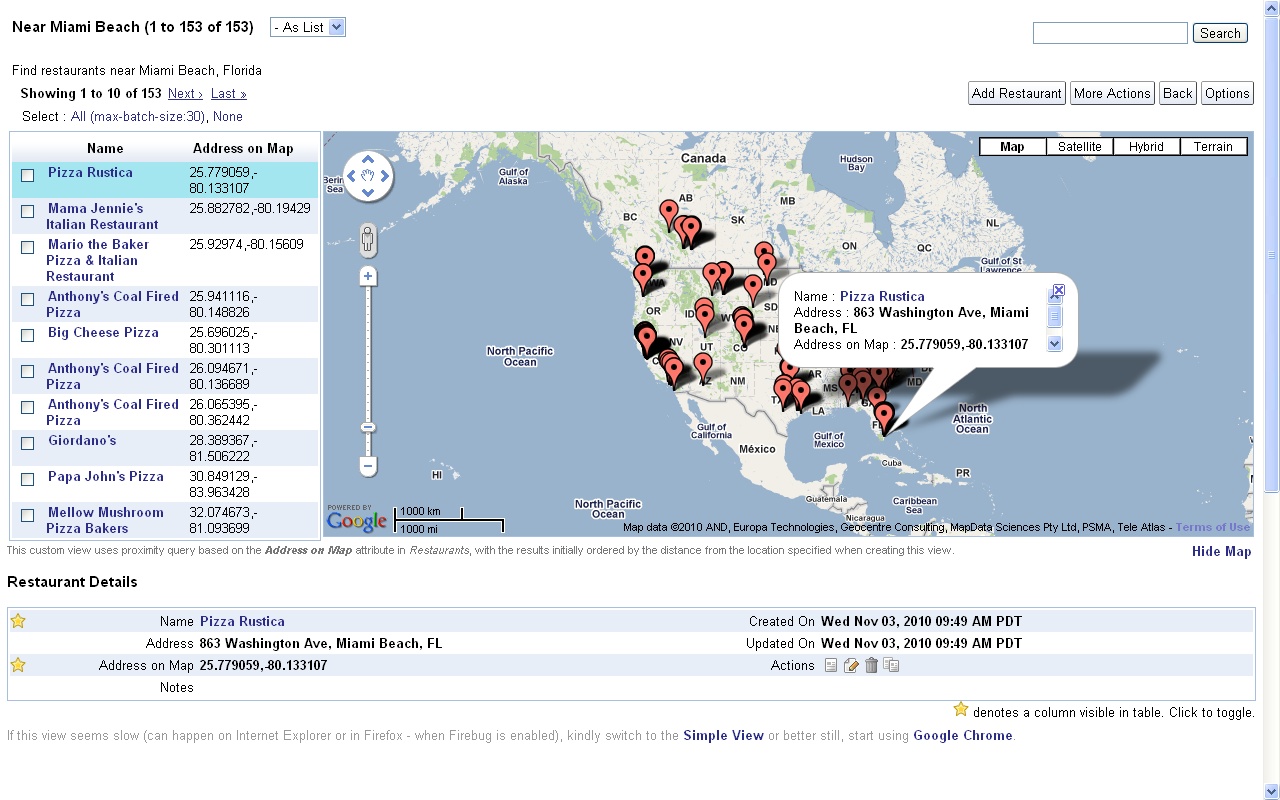

You can also do a quick search without having to create a custom views, by following the links from the details page, to find other records near a particular location.

Hope you like the new geo-location and Google Maps integration features. Do let us know your feedback.

Friday, April 2, 2010

Support for Unique Field Constraints in iFreeTools

Though Google App Engine does not yet support modifiable unique fields, we believe that this is an important requirement for many business apps. So, we have added this feature in our framework layer over Google App Engine to enable unique fields in our Free CRM for Google Apps Engine and in our online database app-builder for Google App Engine.

This feature has been turned on for the email-id fields in iFreeTools CRM - for Lead, Vendor, Contact and User records. The value entered for these fields will be trimmed to remove spaces and converted to lower case, before a unique constraint check is performed, when adding or modifying records.

We will see how this feature can be used in a custom application over iFreeTools Creator. Vehicle registration details in one case where unique values are to be stored for each of the vehicle records. You do not want a duplicate entry to be entered inadvertently into your database. So for the this field, we will enable the Unique constraint and also use the transformation functions trim and upper.


Now, we will proceed to add a record with a duplicate value for this unique field. Notice how the value is given in a lower case and with additional spaces prefixed and suffixed..


When trying to save this record, we will be shown the error message as given in the image below. You will also find that the value has been trimmed and turned to upper-case..


The unique constraints are also enforced during bulk import of data from CSV.

Hope you find the feature useful. Feel free to send in your feedback.

Monday, March 22, 2010

Export / Import Data as CSV & Bulk Delete in iFreeTools CRM and Creator

A new upgrade to our Google App Engine powered CRM application and Online Database App-creator, has added support for Exporting and Importing data in CSV format, along with support for bulk-delete.

Exporting and Importing of data as CSV enables you to
  • store a backup of your data
  • import new data in bulk
  • restore back old-data at a later date, if required, from the back-up
  • take away your data at any time from our database - No vendor locks.

In this blog post, we will have an overview of this new feature, as used in iFreeTools Creator, the approach will be similar in iFreeTools CRM too.

In the default list views, there will now be an option under More Actions to Export as CSV and Import from CSV as shown below..


First export the data as a CSV file and store it locally. This file acts as a backup of the existing data and can also be used as a template to add new data.

You can use any spreadsheet application which supports editing of CSV files. We will use Google Docs for this feature preview. Use the upload option to upload the CSV file to Google Docs..


The spreadsheet will be loaded and will show the entries as present in the iFreeTools database..


We can now add / modify entries in the spreadsheet. We will add 2 new records - of which 1 record will have values in unicode (Tamil language) and update the existing records by adding some notes. The changes made to the spreadsheet are highlighted in the image below..


Now download the modified file from Google Docs, by choosing from the menu File > Download as > CSV (current sheet). Now you can upload the file to iFreeTools. Choose the Import from CSV option and specify the file downloaded from Google Docs and click on Import..


This will import the data into iFreeTools' database, as shown below..

Notice that 2 new entries have been added, with proper handling for unicode characters and that 3 existing records have been updated with notes. The status message on top also provides the details of the import.

Further changes to the imported data can be performed using the Bulk Edit feature, which was added recently.

This update also includes the Bulk Delete option, available under More Actions.

Hope you like our new features. If you face any issues or have suggestions, feel free to use the feedback form in our application.

Friday, March 5, 2010

Custom Actions now supported in Google App Engine powered iFreeTools CRM and Creator

When we added the Bulk Edit feature recently to our Google App Engine powered CRM and our Online Application Builder for App Engine, we had mentioned that we were to make "Custom Actions" available next.

And with today's upgrade, it is now available.

When performing bulk operations, you will now have an option to provide a name for the bulk-edit operation. For admin users one can additionally specify if the Custom Action needs to be available for all users or just for you. In the sample screen-shot below, we are adding a Rented-out custom action, which sets Vacant property as False (unchecked in form)..

And after this proceed with the bulk-edit operation as usual. This will apply the bulk-edit changes and also create a custom action which will be available under More Actions, as shown below.. In the screen-shot the bulk-action buttons (Bulk Edit and Rented-out) will remain disabled, until one or more rows are selected.

You can get to know more details of the Custom Actions by clicking on Action Details. This will list the details of the accessibility of the Custom Action, along with details on the attributes that get changed by the action and if you have the privileges, an option to delete the action, as shown in the image below..

While one can also provide the same custom action name in the bulk-edit form to update an existing custom action, it is just as easy to just delete the action and add it again.

Hope you like the new feature. Feel free to send in your feedback.

Wednesday, March 3, 2010

Building a simple Issue-tracker application on Google App Engine.. Online.

In this blog post we will walk through the steps in creating a simple issue-tracker application over Google App Engine, using iFreeTools Creator.

Login into iFreeTools Creator (no signup required, your Google Account is sufficient) to start building the application.

The overview of the steps involved..

Edit App Settings under Admin and rebrand your application..


As you might notice, there are options to further rebrand the application providing your logo and also to map the application to your Google Apps sub-domain. But we will leave that for now.

Add an entity to store the Bug / Issue details..

We have allowed the viewing of bug database for guest role users. While to create/edit/delete bug entries, they need to have user or admin role.

Add required attributes..

Our Bug database requires to store the following attributes..
  • Tester
  • Title
  • Description
  • Steps to reproduce
  • Severity
  • Date logged
  • Date closed
  • Notes


Add Tester attribute as a reference to User system-entity..


Notice that the attribute data-type for Tester is Reference and the referenced entity is User - which is a system entity.

Similarly add Title as a String and, Description and Steps to reproduce as a Text attributes. Next will be define Severity..

Adding severity with options to choose from..

The options provided are Critical, Major, Minor and Cosmetic.

Proceed to add Date logged and Date closed attributes with data-type as Date.

That is it.

Now, we are ready to start using our Bug-Tracker App

The form for adding a bug will look like the one given below..

Once added, the bugs will get listed in a Bugs list view..


You may also add users, whom you want to provide access. Just provide their email-id associated with a Google Account. Sample user entries added to the application..


Users with guest role can only view the bug lists. While users with admin and user roles can add modify bug details.

Now we can proceed to add more more bug entries to our bug database..


iFreeTools Creator automatically detects attributes which can be used for charts and provides them readily accessible. The data can be visualized in 3 chart types - Horizontal and Vertical (column) Bar charts and Pie Charts.

Bar Chart visualization..


Pie Chart visualization..


Hope you like the features in iFreeTools Creator. If you have any further queries, feel free to write to raj@sahasvat.com or use our feedback form.

Related :
Also See :

Tuesday, March 2, 2010

Google Accounts & Google Apps user-accounts - authentication options in Google App Engine

The issue discussed in this specific post has been solved. We have now added support to enable Google Apps users to login directly into iFreeTools CRM & Creator.

So, no more confusions.. no more work-arounds.
You may skip this post.


This is a short note on the default authentication modes possible with Google App Engine and how we have configured it for our free CRM and our online application builder apps.

There are 2 modes in which applications can be deployed over Google App Engine..
  • Open to all Google Accounts --or--
  • Restricted to a specific Google Apps domain.

Our default application instances (with application identifiers sahasvat-ifreetools for CRM and sahasvat-ifreetools-creator for Creator) are deployed in the first mode, so as to enable access to users with normal Google Accounts.

Since Google wants to treat Google Accounts and Google Apps accounts differently, it can create confusions for users. This means that users with just a Google Apps user-account cannot login to access our default apps.

There are 2 suggested approaches for this scenario..
  • Creating a new Google Account using your Google Apps email-id and proceeding to use the application for free.
  • Have a separate application instance deployed for you over App Engine, with authentication restricted to your Google Apps domain. For details on such a custom deployment, with optional customizations, kindly refer to http://crm.ifreetools.com/about.

You may also read the following blog post which details the confusions caused by the different account types and options to have things working..
Fixing the Google Account problem [www.equalsdrummond.name].

We also plan to offer a free deployment - equivalent to the $299/year plan, but with ads - to enable Google Apps authentication for such deployments. If you are interested, use the feedback form or send an email raj@sahasvat.com to request for details on using such a deployment.

With the OpenID & OAuth support in Google App Engine's road-map, these confusions can be avoided altogether.

If you have any further queries, feel free to write to raj@sahasvat.com or use our feedback form.

The issue discussed in this specific post has been solved. We have now added support to enable Google Apps users to login directly into iFreeTools CRM & Creator.

So, no more confusions.. no more work-arounds.
You may skip this post.