Wednesday, November 3, 2010

Building a Store Locator type Google Maps app over GAE, using iFreeTools

Our free CRM app over Google App Engine and our online database application builder now support geo-location features and integrate well with Google Maps.

For iFreeTools CRM, we have added the geo-location features to all records which have address values. So, you could now store and search for Leads, Contacts, Accounts and Vendors based on geo-location criteria and view them in a map view based on Google Maps.

iFreeTools Creator, which is our online app builder, also supports the geo-location features.

In this blog post, we will walk-through the steps in creating a simple store locator type application using iFreeTools Creator, to showcase the geo-location and Google Maps integration features.

We will also upload a sample CSV file, reusing a CSV file from Google's tutorial on building a similar store locator type app (that tutorial, by the way, details about building such an app using PHP and MySQL).

The overall steps involved are as given below..
  1. Login into iFreeTools Creator.
  2. Edit App Settings to change the time-zone and branding. (optional)
  3. Create Entity (or "table") to represent Stores.
  4. Create Attributes (or "fields"/"columns") for the Entity.
  5. Start using the app.
    1. Uploading data from sample CSV file. (optional)
    2. Create custom views to filter based on geo-location . (optional)

Step 1 : Login into iFreeTools Creator

This is simple. No sign-up forms. Just login using your Google user account or your Google Apps user account into iFreeTools Creator.

Step 2 : Edit App Settings to change the time-zone and branding. (optional)

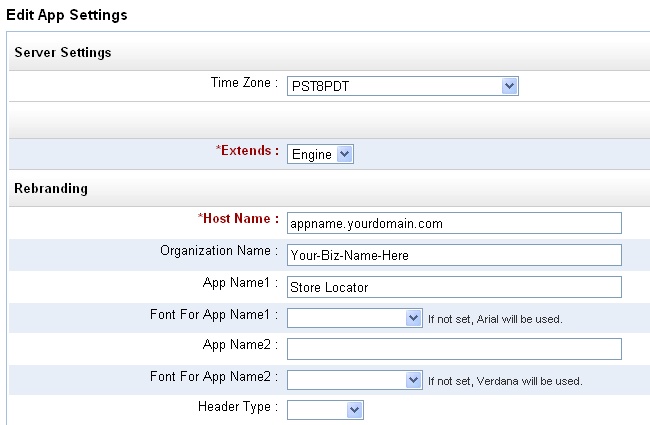
You can re-brand & customize your app from under Admin > App Settings, providing your time-zone and also change the app names from their defaults. The below image shows the changes I have made : choosing PST8PDT as the time-zone and changing the app name to Store Locator.

Step 3 : Create Entity (or "table") to represent Stores

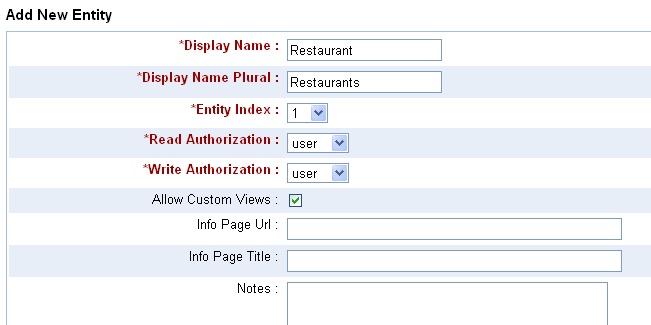
Proceed to Admin > Entities > Add Entity and provide details of the entity which will hold our data. Let us call the entity Restaurant..

Step 4 : Create Attributes (or "fields"/"columns") for the Entity

Once you add the entity, you can then add the attributes for that entity - either from the Entity details page, which you get after completing step 3 or from Admin > Attributes > More Actions > Add multiple Attributes to add them in one shot. For our demo we will use 3 attributes Name, Address and Address on Map, the first 2 being string (or text input fields) while the 3rd is a GeoPoint, which enables us to refer to a specific location on a map and store that value in the database..
The Property Index helps in specifying the order of the attributes. Name comes first, followed by Address and 3rd is Address on Map.

Step 5 : Start using the app

That is it !!
You could just start using the app, adding restaurant entries using the automatically generated form, as shown below..


Step 5.1 : Uploading data from sample CSV file. (optional)

We will now try to upload a sample CSV file. Save this sample CSV file to your disk and edit it to add the column headers, which for this CSV file are..
Name,Address,Latitude,Longitude


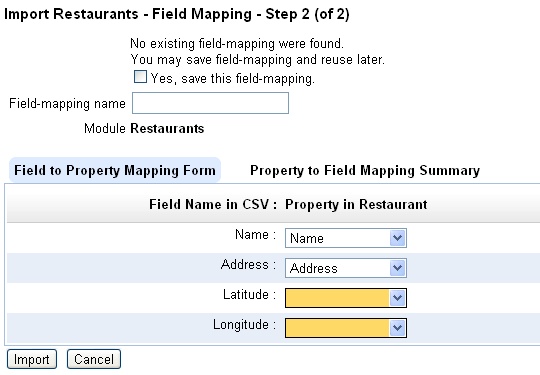
Now proceed to import this CSV file from Restaurants > More Actions > Import from CSV and provide the CSV file and proceed to mapping of fields. The initial mapping will be something like given below..

Now provide the mapping for the latitude and longitude, with both being mapped to Address on Map attribute..
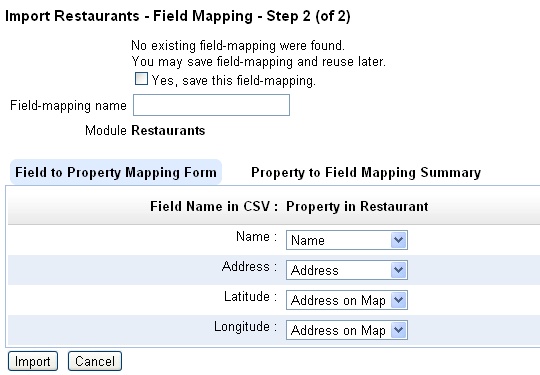

The reverse mapping shows that both the latitude and longitude fields will be combined together for the geo-location value to be stored in Address on Map attribute..
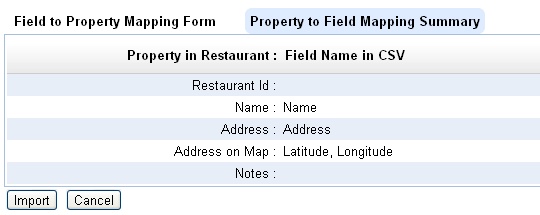

Proceed to import all data into the database. The resulting list view after upload will be like given below..


And the map view (when you click on the View Map link below the table list) will be like given below..


Step 5.2 : Create custom views to filter based on geo-location . (optional)

You can also create multiple custom views to filter data based on nearness criteria.

For example, following are the entries to create a custom view to find stores near Miami Beach, Florida..
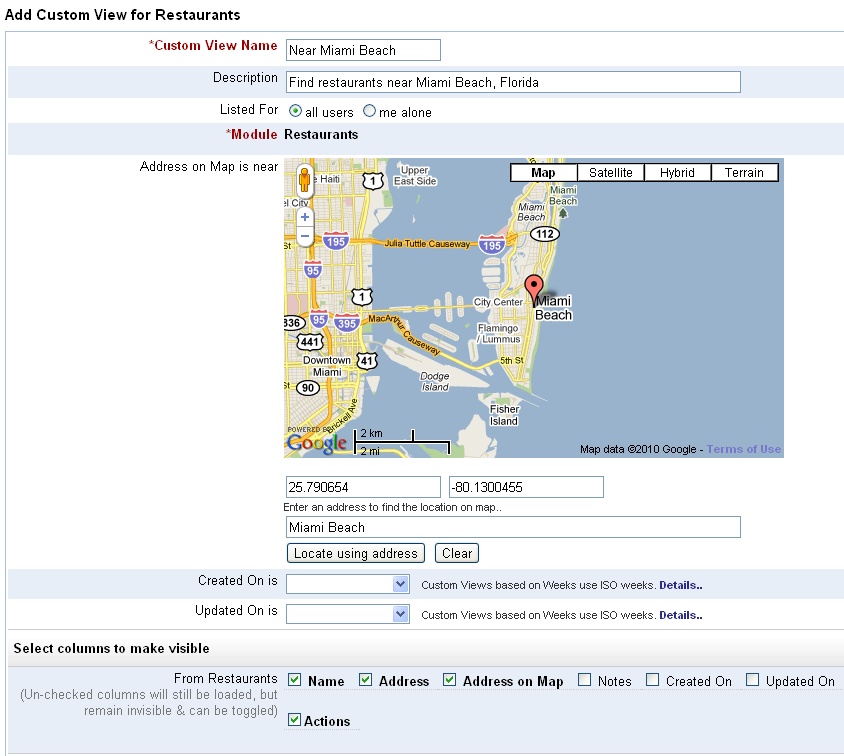
One can provide an approximate address and automatically have the marker placed in that location. Also notice that I have modified the columns that are to be displayed in the list view.

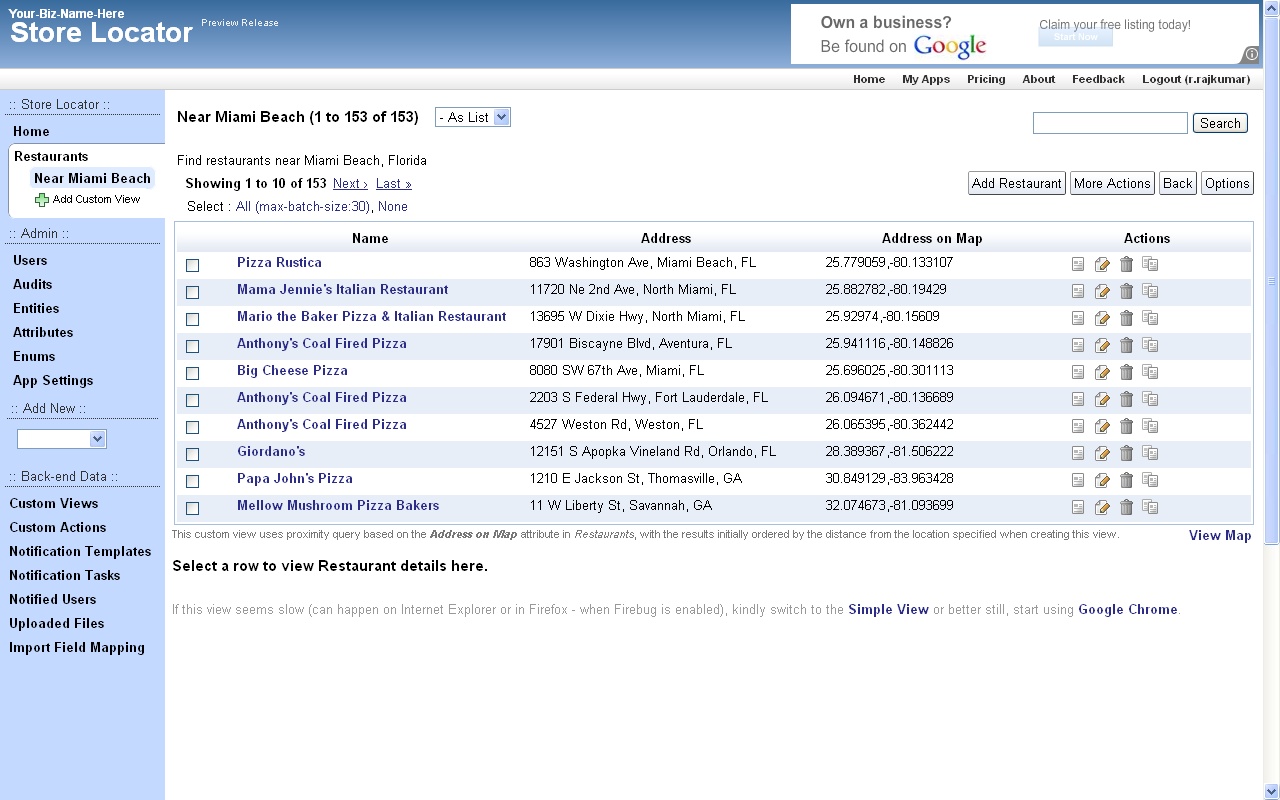
After saving the view, the resultant list view will be something like given below, with the records sorted based on the nearness to the location we specified when creating the custom view (that is, near Miami Beach, Florida)..

And the corresponding map view will be like the one given below..
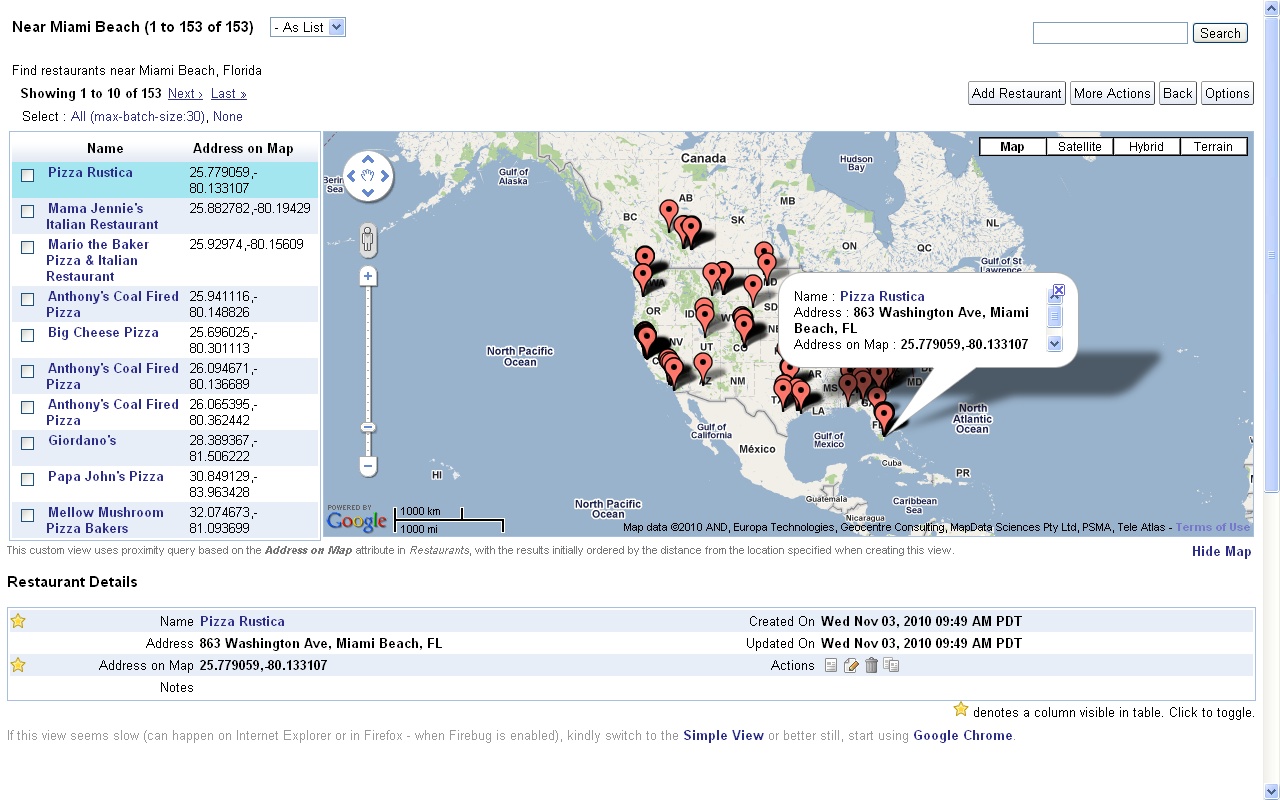

You can also do a quick search without having to create a custom views, by following the links from the details page, to find other records near a particular location.

Hope you like the new geo-location and Google Maps integration features. Do let us know your feedback.

Wednesday, October 6, 2010

Custom Views now support Template Criteria for User References and Date/DateTime fields

There are some pre-created views in iFreeTools CRM like My Open Leads, My Open Cases and My Pending Tasks which lists the records, based on the user who is currently logged-in and accessing the application, showing only the records owned by them in that view.

While one can created Custom Views providing specific user references, there was no way to create a view with such dynamic values referring to the currently logged-in user.

Similarly, while there are pre-created views like Due Today, Due Tomorrow (in Tasks module), which lists the records based on the when the view is getting accessed. Until now, it was not possible to create such views using the Custom Views in iFreeTools.

But now, we have now added support for using dynamic filtering criteria values in Custom Views, for User reference attributes and date, date-time attributes.

Dynamic User-reference values in Custom Views

While you still have options to choose specific user references, when adding Custom Views, you are now provided with an option to choose dynamic values, as shown in the image below..


Choosing the option adds the criteria as a template value - ${user}, referring to the currently logged in user..


This template criteria value will be replaced dynamically, when users access the Custom View.

Dynamic filtering for Date, DateTime fields using Custom Views

Until now we did not support date and date-time fields in Custom Views. This was due to certain limitations in the querying capabilities of Google App Engine. While the limitations remain, we have overcome them to enable you to create Custom Views providing dynamic criteria values for date, date-time fields.

You can now filter out records using on the following dynamic criteria values..
${today}, ${tomorrow},
${this_week}, ${last_week}, ${next_week},
${this_month}, ${last_month}, ${next_month},
${this_year}, ${last_year}, ${next_year}

as shown in the image below..

Here again, the template criteria value will be replaced dynamically, when users access the Custom View.

This date/date-time filtering feature in Custom Views internally uses indexes for querying the data. These indexes for database records are something like an index in books, helping you find the required records.

While new data will be automatically indexed, existing data has to be updated at least once, so that the records can be indexed automatically.

One can trigger indexing from the list views by selecting one or more records and then clicking on More Actions > Re-Index.

Hope you like the new template-criteria based Custom Views.

There are no upper limits on the number of Custom Views one can add to our GAE(Google App Engine)-hosted Free CRM for Google Apps and to our GAE-hosted Online Database App Builder. So, feel free to add as many views as you would like and do send in your suggestions on how you think the apps can be enhanced to make it even more useful.

Would you like to have iFreeTools deployed onto your Google App Engine account? Yes, we offer custom deployment options, starting at $99/year for upto 25 users, enabling you to use the free quota (1 GB of storage and 2000 emails/day) offered by Google and to buy more resources as per requirements, directly from Google. Contact raj@sahasvat.com for more details.

Tuesday, September 28, 2010

Easy bulk addition of database records in iFreeTools CRM & Creator

Apart from the existing support for importing data in bulk using CSV files, we have now enabled support for bulk-addition of database records directly within our online apps.

From the list views (under More Actions) and from the details views (for adding Related Records), you will now find an option to add multiple entries of the records. Using this you can easily enter details for multiple database records in a single page and then save them all at once.

The form for adding multiple entries will be like the one given below..


In the above screen capture, multiple tasks are being added for a lead. By default the attributes which are marked as requiring a value along with a few other attributes are made visible in the form. One can change the attributes listed in the form by clicking on the Show/Hide Attributes link on the top-right.

When adding new rows, the values from the first row will be copied. So you can set the defaults in the first row and then have them copied to the new entries. You may also remove entries from the form, before you save them to database.

Once the details are added to the database, you can return back to the page from where you came to this form and see the records you had just added.

This feature is available in both the Free CRM for Google Apps and the Free Online Database Builder for Google Apps.

Hope you like our new feature. Feel free to send in your suggestions.

Private deployment of iFreeTools into your own Google App Engine account starts at $99/year for upto 25 users. For unlimited users it is just $299/year. Additional customizations are optional and are billed at Indian rates. If you are interested in such a private deployment, contact raj@sahasvat.com.

Wednesday, September 1, 2010

Image fields now supported in the Free Online Database builder for Google Apps

We have now added support for defining and using Image fields in iFreeTools. This has been enabled for the Products database in iFreeTools CRM and can also be used for your custom online databases, using iFreeTools Creator.

A sample view of such a database listing is given below in a snapshot of a Travel Desk application built using iFreeTools Creator. The thumbnails of the images are listed in this table view..


When you proceed to the individual record's details page, you can see a bigger image..


When adding/editing records, you have options to either upload a new image or using an already uploaded image from the database of uploaded files. The options available for editing the image fields are show in this below image..


All uploaded files can be managed easily from Back-end Data > Uploaded Files, where CSV files used in importing data are also listed..


You could rename the files and change the descriptions or even, download the file from the details page..


When adding/editing the attribute you could specify the maximum file size for the image. For free versions the options available are 10, 25, 50 and 75 (all sizes in KB). If the uploaded image is of bigger size, the app will try to resize and reduce the file size to confirm to your settings..


You can go in for bigger image sizes when we open up our paid plans or if you go in for our custom deployment options, which enables you to use the 1 GB free quota from Google and to purchase additional resources directly from Google at $0.15/GB/month.

The rates for custom deployments start at $99/year (works out to $8.25/month) for upto 25 users (or $0.33/user/month). For unlimited users, it is just $299/year.

Hope you like our new feature. Do feel free to send in your suggestions using the feedback form in our apps or directly via mail to raj@sahasvat.com

Wednesday, August 18, 2010

Importing Google Contacts into CRM database is now supported

We have now added support in the CRM for Google Apps - iFreeTools CRM, to directly importing Contact entries from your Google Contacts into your CRM database.

In all contacts list views, you will now have an option to "Import from Google Contacts". Clicking on this, Google will prompt you to ask if iFreeTools CRM can be allowed access to your Google Contacts. Once you provide access, you will be redirected to your list of contacts from Google Contacts, from which you could selectively mark and import into your CRM database.

You will have options to list contacts based on Contacts Groups you had assigned in Google Contacts, change the sort order (by default the latest updated entries are listed on top) and the page-size (default : 50).

If a contact is already found in the CRM database, it will be skipped during add. But you could change this behavior to either add a duplicate record or to over-write the existing record with values from Google Contacts.

The following snapshot shows the options available during import. Here "random" is one of my Google Contacts groups.


You can also preview the details of the contact, before you mark it for import. The following snapshot shows such a preview of one of the contacts..


After marking the entries you want to be added to the CRM database, you could then click on "Add Contacts". This will add the marked entries in batches, displaying you the status of the progress.

Once added, you could view these contacts in the CRM database. Apart from the standard details, additional details will be added to the Contact record's Notes attribute. Snapshot of a sample record imported from Google Contacts is given below..


By default, the user who imports the entries will be set as owner for those records. You could use the bulk-edit feature to change values as required.

Hope you find our new feature useful. Keep sending in your suggestions on how you think we can make things better & easier for you.

Wednesday, July 28, 2010

Import Field Mapping now available in iFreeTools CRM / Creator

iFreeTools CRM - the free CRM built over Google App Engine, for use with Google Apps - now supports import field mapping.

Now you can map fields from CSV files imported from other sources by providing the field mapping in an easy to use interface, instead of having to manually mapping them in the CSV file. The source can be address book from Outlook or from Google Contacts exported as CSV, or even from your old CRM/database system.

Such field mapping can be saved and reused multiple times.

To enable this mapping, the import process will now contain 2 steps. First one will be similar to the one which we had earlier, where you could provide the CSV file to be imported..


The next step will be to provide the mapping. By default, the app will try to match the fields in the CSV with the property in iFreeTools record. The unmapped fields will be highlighted as shown below..


You may now provide the mapping for all fields which you want to import into iFreeTools. You could even map multiple fields from CSV to a single field in iFreeTools. The multiple values will be joined together and stored in the property.


You can view the reverse mapping to see if you have covered all important mapping.


In CRM, if the records require an "owner" property, it will be set to the user who performs the import operation. You could later use the Bulk Edit feature to reassign owners as required.

You could also provide a name for the import field mapping, so that you could just select it from the selection box the next time you need to import a similar CSV file.

This feature is also available for custom database apps created using iFreeTools Creator.

Saturday, June 26, 2010

Support for Time Zone, Customizable Home Page and List View Settings, Printable Reports and more..

At iFreeTools, we prioritize our features by listening to our users. Over the past couple of weeks, we have been adding the following features to iFreeTools, based on suggestions from our users..
  • Support for Time Zones
  • Customizable Home Page
  • Support for viewing additional attributes from referenced parent records, in child record's list views.
  • Customizable View Settings (Columns to View, Page Size, etc.,)
  • Printable Reports (List & Chart Views)
  • Pop-up selection for reference values.
  • Option to hide Created On, Updated On and Notes in custom Entities.

Details of the new features are given below :

Support for Time Zones

Until now, we had been displaying date-time values in UTC. Now, users can choose to display the date-time values in their time-zone. Just select the required time-zone value in Admin > App Settings and have it reflected in all views.


Customizable Home Page

You can now configure the home page contents (apart from just the About page, until now), from Admin > App Settings. This will be used as the content of your home page when accessing from your domain.

Within the home page contents, you may use BBCode for safe-rendering of HTML content. The supported BBCode tags you may use are : b, i, u, s, link, img, list with *, size, color and center.

Such a sample content provided in the App Settings is shown below.


The resulting page when accessed via the configured domain is shown below.

Live link of that sample home page : http://acme.sahasvat.com

Support for viewing additional attributes from referenced parent records, in child record's list views

It is typical requirement to view a parent record's attributes along with the child record's attributes in list views - for example, attributes from Account records (parent) shown along with Contact records (child).

Earlier we only had a link to the Account record details; but now, you can view values from the Account record right in the list of Contact records.

When creating or editing Custom Views, you can select the attributes you want to be displayed and it will get shown in the client.

[Screen-shot of this feature, shown along with next feature]

Customizable View Settings (Columns to View, Page Size, etc.,)

Apart from including the parent attributes in the list views of client (previous item), you can also specify the columns you want to make visible from the client's attributes. Other attributes will still be loaded in the client, but will not be visible. They can be toggled for visibility from Instant Details, as was possible earlier.

You can also specify the page-size and optionally disable the Instant Details and search-while-typing features. This can be configured at a Custom View level or at the app level from Admin > App Settings.

The following image shows the new features of selecting additional attributes from referenced parent records and customizable view settings..


Printable Reports (List & Chart Views)

Now all list views and chart views have an option to have a printable view. This view will be without the header, side-bars, footers and advertisements.

This feature is accessible from under Options in the list views and as a top-level button in chart views.

Pop-up selection for reference values.

Until now the reference value selection was possible only from select boxes. While this is fine if the number of values is less, this can be difficult to use in case there are more options from which to choose from.

From now on, if the options are more than 20, iFreeTools will automatically provide a pop-up option to choose the reference value. This option will enable selection from a list view, where you can sort and search the records and then select the required record instance for reference.

Option to hide Created On, Updated On and Notes in custom Entities.

This feature is applicable for iFreeTools Creator - which allows creating custom entities. You may now opt to *hide* the default attributes added to an custom entity, which are date-time stamps for Created On and Updated On and the text attribute Notes.

This only hides the attributes and can be re-enabled back again at any time.

--

By choosing to use our products, you show your commitment to us. Our way of thanking you for this, is to listen to your feedback and acting on it, so as to help you use our tools better.

Keep sending in your suggestions.