Tuesday, February 15, 2011

Google Contacts integration : Import-to / Export-from any database table, in iFreeTools

Having come a long way in our support for importing data into iFreeTools, today, we are glad to announce support for importing contact details from Google Contacts into any database table which has an email-id field, along with support for exporting contact details from such tables back into Google Contacts.

Using Field Mappings we have enabled mapping a virtual Google Contact entity to entities within iFreeTools database and use these Field Mappings to integrate with Google Contacts, with the help of Google Contacts API.

iFreeTools CRM will have out-of-the-box native field mappings defined for Contacts, Leads and Vendors. You can also add Field Mappings for your custom entities in iFreeTools Creator, to enable importing / exporting the contact details in your custom database tables.

When Field Mapping is not found for an entity with an email-id field in iFreeTools Creator, you will find a button to Enable import from Google Contacts, below the list views. Clicking on the button will take you to the Field Mapping form. Such a form loaded for mapping Owner entity in our sample database app over iFreeTools Creator is shown below. If the field names match the fields will be mapped by default, like the Notes field as shown in the below image..
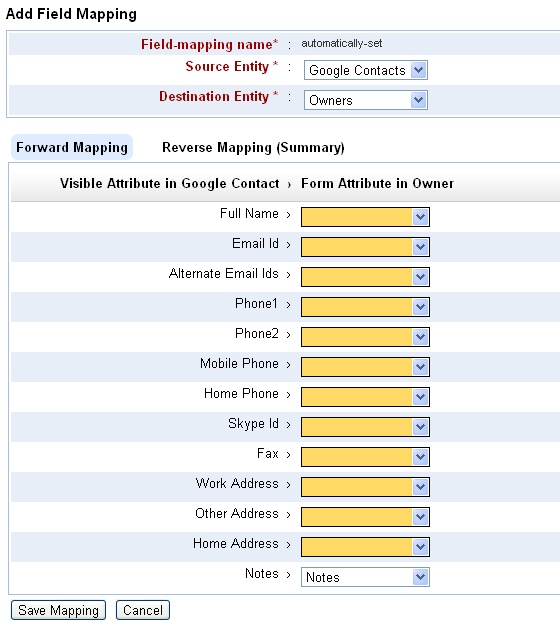

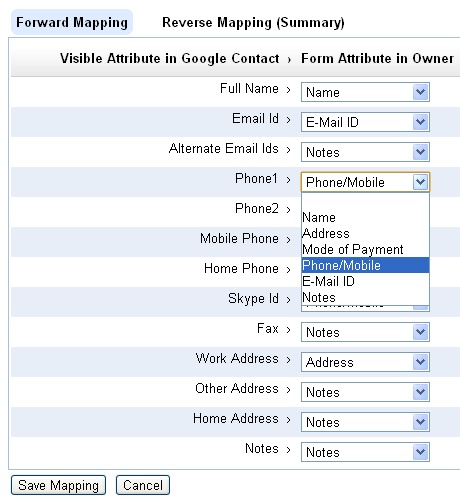
You can proceed to complete further mapping of the fields. You can store value from more than one field into the same field. For example, Phone/Mobile will be the destination for Phone1, Phone2, Mobile Phone, Home Phone and Skype Id. Similarly Alternate Email Ids, Fax, Other Address, Home Address and Notes from Google Contact have all been mapped to Notes field in Owner..

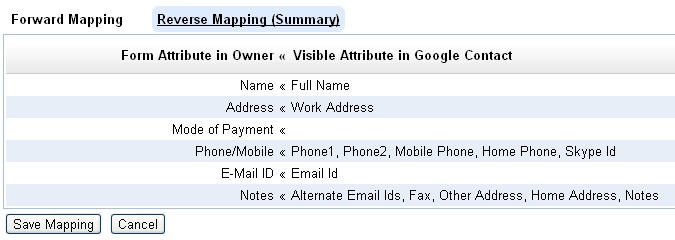
The reverse mapping view shows the details on the multiple source fields getting mapped to a single destination field..

Adding such a field mapping enables importing the Google Contacts directly into the Owners database.

Like wise, it is necessary to add the mapping for exporting Owner details back to Google Contacts.

Exporting of records will be possible once you have authorized iFreeTools to connect on your behalf with Google Contacts, using its data APIs. This will be done when you try to import from the Contacts, that is clicking on Import from Google Contacts and completing the authorization step.

Once authorization step has been completed, you will find a upload icon in the list views for each of records. You can then click on them to selectively export the required records to Google Contacts. Bulk export of contacts into Google Contacts will be supported subsequently. If a contact already exists in Google Contacts, it will be over-written with the full set of details from iFreeTools, based on the field mapping for export.

Hope you like the new feature.

----

A little bit of history, leading up to this feature.

iFreeTools initially had CSV import alone and that too without field mapping. That is, the fields in CSV file are supposed to have specific set of column names expected by our import system. So, to get contacts details from Google Contacts, one had to export the Google Contacts into CSV, map the header names manually in the CSV file and them import them into iFreeTools.

While our initial feature was good enough to help enable import process, we wanted to make things easier for our users. So we added CSV import field mapping feature, to enable mapping the fields in CSV file to those in the database records, enabling CSV files with proprietary column headers to be mapped and imported easily into the database. This mapping could also be saved for reuse in subsequent imports in the same format, typically from the same source.

As all our users have a Google user account or a Google Apps user account, we wanted to integrate well with Google services, particularly Google Contacts. So, we followed up with support for importing Google Contacts using Google’s APIs, directly into the Contacts database in iFreeTools CRM.

To import the contact details using Google APIs into some other database table - may be Leads, Vendors, or may be into a custom database table created in iFreeTools Creator - was still not possible. Uploading contact details back into Google Contacts was also not possible, until today's feature.

We strive to keep adding new features while also improving features to make them easier, for our users. Keep sending in your suggestions on how we can make things better for you. You may use the feedback form in the application or you may send a mail to raj@sahasvat.com

Tuesday, January 25, 2011

"List" data type, now supported in Online Database App Creator

Our online database app creator, which is built over Google App Engine for use with Google Apps, now allows users to define and use List fields.

In this blog post, we will showcase this new feature by adding 2 list attributes to our sample Property Management app.

List attribute without choice values

We will add a new attribute to list down the facilities available in the managed properties in our database. When adding the attribute select the Data Type as List (with String values).


Defining a new attribute with the List data-type will result in a simple text-box for data-entry where one can enter comma separated values. These values will be parsed and stored as a list in that entity instance.

In our case the facilities can be something like Covered Car Park, 24x7 Security. This will get stored internally within Google App Engine's data-store as a list value with two items, [Covered Car Park, 24x7 Security].

We will be coming up with auto-complete to help fill in list fields in forms, at a later date.

List attribute with choice values

One can also specify the choice values for the List. When choice values are provided, the form will have a list of check-boxes - one each for each choice value. Making use of choice values also enables creating Custom Views based on this attribute, as well as including them in automatic chart view options.

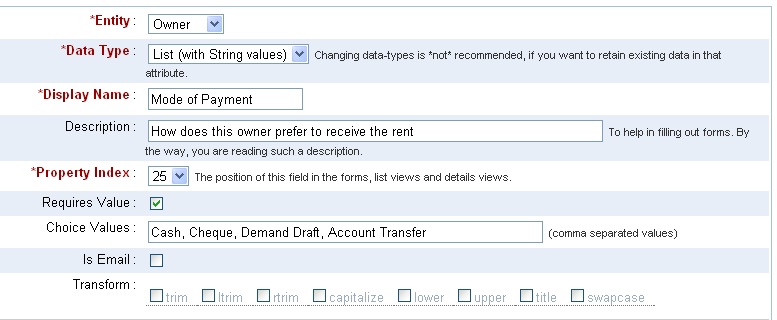
We will define a List attribute to store the preferred mode of payment for the Owners, as shown below.


The form generated, for this List property with choice values, will have check-boxes for each of those choice items. The user can select one or more values, each of which will be added to the List field of that record instance.


The chart view will make use of the choice values to generate the Bar charts.

Notice that the total need not match the number of records because each record may have more than one value. For this reason, the pie-charts have also been disabled.

Hope you find the List data-type useful in your online database app over iFreeTools Creator. Do let us know your suggestions and feedback.

Wednesday, December 8, 2010

Access Control up to Field-Level, now possible in iFreeTools CRM & Creator

Until now, iFreeTools CRM and iFreeTools Creator had role based access control alone.

In this mode, users can be associated to a role which can be admin / user / guest and access control can be specified (in Creator, for custom entities) to restrict read / write operations based on these roles. It was not possible to segment records based on departments (Sales / Marketing / Support / etc.,.) or based on territories (typically useful for geographically distributed offices). It was also not possible to have field-level permissions.

Not anymore.. we have now added support for adding authorization profiles to enable defining access control permissions and associating them with user accounts.

Using authorization profiles, you can..
  • allow / block access to specific modules (record types) as a whole,
  • allow / restrict access to specific operations alone, like controlling permission to View, Add, Edit, Delete, Export records or to Send Emails,
  • define scoping criteria to segment the records at operation-level. This scoping criteria can be based on any attribute which contains choice values (which include departments and territories, if you have enabled them) and based on user-reference attributes. One can define criteria to enforce access conditions like “Allow editing of records only if the user is the record owner”,
  • define permissions for access to fields at the operation-level, to enable conditions like “Allow viewing X, Y and Z fields, but restrict editing to X and Y fields alone”.

Sample Walk-through on using the Auth Profiles in iFreeTools

Let us take a sample application and walk-through the steps to enforce authorization rules for that application using this new feature. Our sample app will be a simple help desk application to hold the records for Customers, Solutions & Cases and will have the following authorization requirements..
  • Customer login :
    • Allowed to view available solutions
    • Raise new cases and edit them as required.
    • Edit their own customer record to update contact details (address, phone, etc.,)

  • Support staff login :
    • Allowed to view all solutions, add new solutions and edit the ones for which they are the owner.
    • Allowed to view all cases and edit to update the records to associate relevant solutions.
    • Full access to Customer records.
For our walk-through, we will define 3 record types : Customers, Solutions and Cases.

Note : While there is more to a full-fledged help-desk application than just maintaining the records - like say, notifying the Customer-owner (support staff) when the Customer adds a new Case, notifying the Customer when the support staff responds to cases and escalating to notify the manager when a case has not been closed for long - we will deal with the records part alone for now. We will come back to this walk-through to cover other use-cases when we add support for work-flows and triggers.


Concise representation of the data-model :

Customer (name*, company, $< phoneEmailEtc >, $< contactAddress >, owner, userAccount< User >*)
Solution (question*, answer*~~, owner*, status&)
Case (subject*, type&*, status&*, origin&, priority&, reason&,
reportedBy< Customer >*, reportedByUser< User >*, description~~*, owner, solution< Solution >)
* means the attribute is required
~~ refers to a Text attribute,
& means the attribute has choiceValues
$< phoneEmailEtc > and $ < contactAddress > add multiple attributes
attributeName< ReferenceClass > refers to a reference attribute, owner defaults to < User > reference


Pseudo-code representation of the data-model :

(useful if you want to add Entities and Attributes)

Customer (plural : Customers ) :
String name as Name required
String company as Company
String emailId as "Email Id" {isEmail:True}
String phone as Phone
String mobilePhone as "Mobile Phone"
String homePhone as "Home Phone"
String skypeId as "Skype Id"
String website as Website
String addressLine1 as "Address Line1"
String addressLine2 as "Address Line2"
String city as City
String zipCode as "Zip Code"
String state as State
String country as Country
GeoPoint addressOnMap as "Address on Map"
Reference owner as Owner {refersTo:User}
Reference userAccount as "User Account" required {refersTo:User}

Solution (plural : Solutions ) :
String question as Question required
Text answer as Answer required
Reference owner as Owner required {refersTo:User}
String status as Status {choiceValues:[Draft, Reviewed, Duplicate]}

Case (plural : Cases ) :
String subject as Subject required
String type as Type required {choiceValues: [Problem, Feature Request, Question] }
String status as Status required {choiceValues:[New, On Hold, Escalated, Closed]}
String origin as Origin {choiceValues:[Web, Email, Phone]}
String priority as Priority {choiceValues:[High, Medium, Low]}
String reason as Reason {choiceValues:[User did not attend any training,
Complex functionality, Existing problem,
Instructions not clear, New problem]}
Reference reportedBy as "Reported by" required {refersTo:Customer}
Reference reportedByUser as "Reported by User" required {refersTo:User}
Text description as Description required
Reference owner as Owner {refersTo:User}
Reference solution as Solution {refersTo:Solution}


You need not have to create these entities and attributes manually. Just use the following CSV files to import this data-model directly into iFreeTools Creator..
Once you have imported the Entities and Attributes to iFreeTools Creator, we can now proceed to defining the authorization profiles for the use in this help-desk application.

Note on additional segmentation : When adding/editing entities, you can configure the entities to use additional segmentation based on department and/or territory. You can choose not to segment the records (default option for empty value), or make it optional / required. Making it optional/required will result in a new attribute getting added to the entity, with selection values to choose from for department/territory. You can customize the values for this selection from under Admin > Enum.


This walk-through does not use additional segmentation. But feel free to add/edit entities, to include them if required.


First we will create an authorization profile for customer login. Proceed to Admin > Auth Profiles > Add Auth Profile.

The initial screen for adding the authorization profile will be like given below..


Customers need not have access to the User records, so we will not enable access for those records.

When customers access the Customer records, they should be able to view their own record and can have the facility to update their contact details themselves. The following image shows the authorization configuration for Customer records..


For Solutions, customers can be allowed to view all Solutions which are in Reviewed status. The fields to be made visible can be restricted to Question, Answer and Created On.


With respect to Case records, customers can be allowed to view only the cases reported by them. They can add new Case records and can edit Cases they had reported earlier. They will not have permission to delete or to export them. The following image shows the required auth-profile configuration to achieve the same..


Proceeding to save the Auth Profile, we get to see the following details page..


Similarly we can add an Auth Profile for support-staff, as per the authorization requirements we listed earlier. The details page of the Auth Profile for support-staff is shown below..


That is it, we have completed the Auth Profile configurations. Now you can add or edit users, from under Admin > Users, and associate the Auth Profiles to the User records.

Note: Auth Profiles take effect only for non-admin users, that is users having role as user or guest.


When the user logs-in into the application, the authorization profile we configured and associated with their user-account will take effect automatically.

Hope you like the our new feature. Such fine-grained access control features are part of the “premium” plans in almost all other online CRM apps / online-database-app builders, if at-all available. We at iFreeTools are glad to offer it as part of our free version at iFreeTools CRM and iFreeTools Creator.

Wednesday, November 3, 2010

Building a Store Locator type Google Maps app over GAE, using iFreeTools

Our free CRM app over Google App Engine and our online database application builder now support geo-location features and integrate well with Google Maps.

For iFreeTools CRM, we have added the geo-location features to all records which have address values. So, you could now store and search for Leads, Contacts, Accounts and Vendors based on geo-location criteria and view them in a map view based on Google Maps.

iFreeTools Creator, which is our online app builder, also supports the geo-location features.

In this blog post, we will walk-through the steps in creating a simple store locator type application using iFreeTools Creator, to showcase the geo-location and Google Maps integration features.

We will also upload a sample CSV file, reusing a CSV file from Google's tutorial on building a similar store locator type app (that tutorial, by the way, details about building such an app using PHP and MySQL).

The overall steps involved are as given below..
  1. Login into iFreeTools Creator.
  2. Edit App Settings to change the time-zone and branding. (optional)
  3. Create Entity (or "table") to represent Stores.
  4. Create Attributes (or "fields"/"columns") for the Entity.
  5. Start using the app.
    1. Uploading data from sample CSV file. (optional)
    2. Create custom views to filter based on geo-location . (optional)

Step 1 : Login into iFreeTools Creator

This is simple. No sign-up forms. Just login using your Google user account or your Google Apps user account into iFreeTools Creator.

Step 2 : Edit App Settings to change the time-zone and branding. (optional)

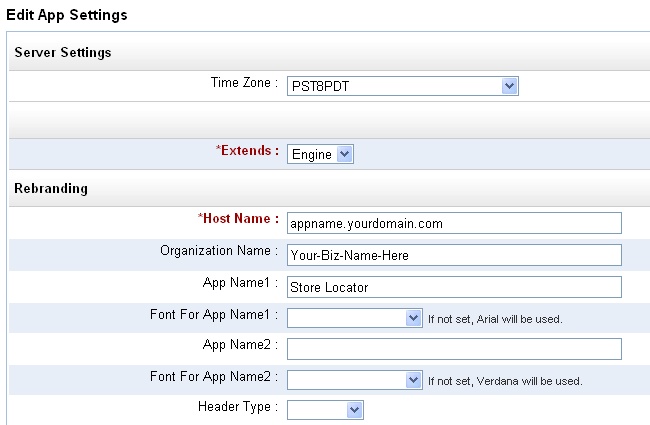
You can re-brand & customize your app from under Admin > App Settings, providing your time-zone and also change the app names from their defaults. The below image shows the changes I have made : choosing PST8PDT as the time-zone and changing the app name to Store Locator.


Step 3 : Create Entity (or "table") to represent Stores

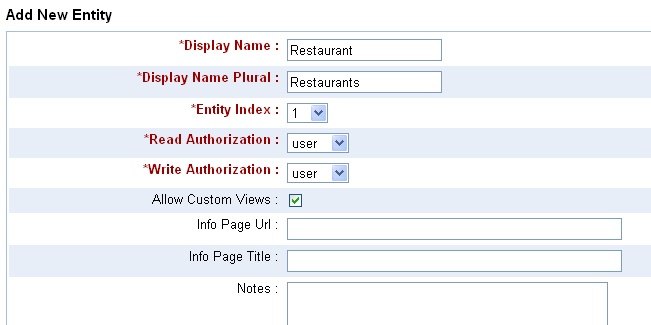
Proceed to Admin > Entities > Add Entity and provide details of the entity which will hold our data. Let us call the entity Restaurant..


Step 4 : Create Attributes (or "fields"/"columns") for the Entity

Once you add the entity, you can then add the attributes for that entity - either from the Entity details page, which you get after completing step 3 or from Admin > Attributes > More Actions > Add multiple Attributes to add them in one shot. For our demo we will use 3 attributes Name, Address and Address on Map, the first 2 being string (or text input fields) while the 3rd is a GeoPoint, which enables us to refer to a specific location on a map and store that value in the database..
The Property Index helps in specifying the order of the attributes. Name comes first, followed by Address and 3rd is Address on Map.

Step 5 : Start using the app

That is it !!
You could just start using the app, adding restaurant entries using the automatically generated form, as shown below..


Step 5.1 : Uploading data from sample CSV file. (optional)

We will now try to upload a sample CSV file. Save this sample CSV file to your disk and edit it to add the column headers, which for this CSV file are..
Name,Address,Latitude,Longitude


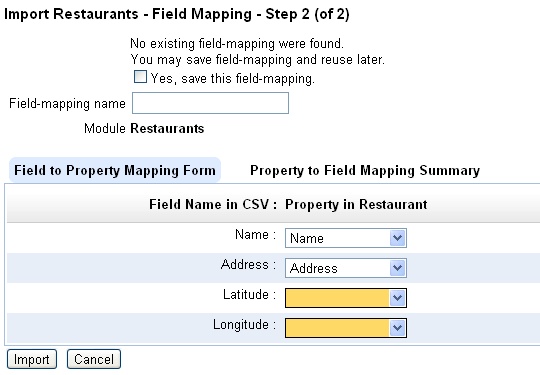
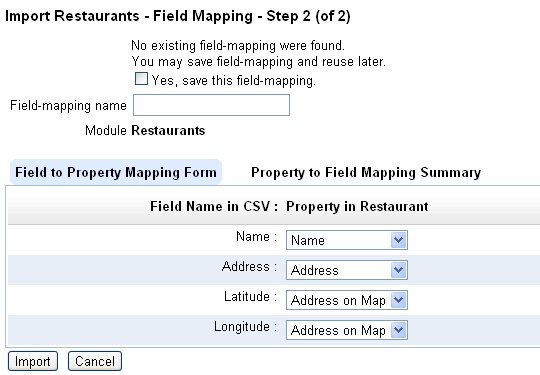
Now proceed to import this CSV file from Restaurants > More Actions > Import from CSV and provide the CSV file and proceed to mapping of fields. The initial mapping will be something like given below..


Now provide the mapping for the latitude and longitude, with both being mapped to Address on Map attribute..


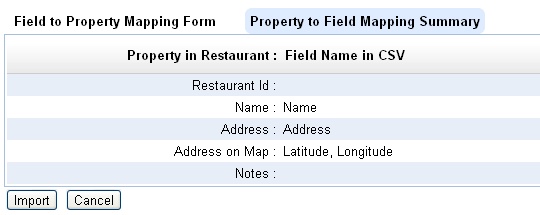
The reverse mapping shows that both the latitude and longitude fields will be combined together for the geo-location value to be stored in Address on Map attribute..


Proceed to import all data into the database. The resulting list view after upload will be like given below..


And the map view (when you click on the View Map link below the table list) will be like given below..


Step 5.2 : Create custom views to filter based on geo-location . (optional)

You can also create multiple custom views to filter data based on nearness criteria.

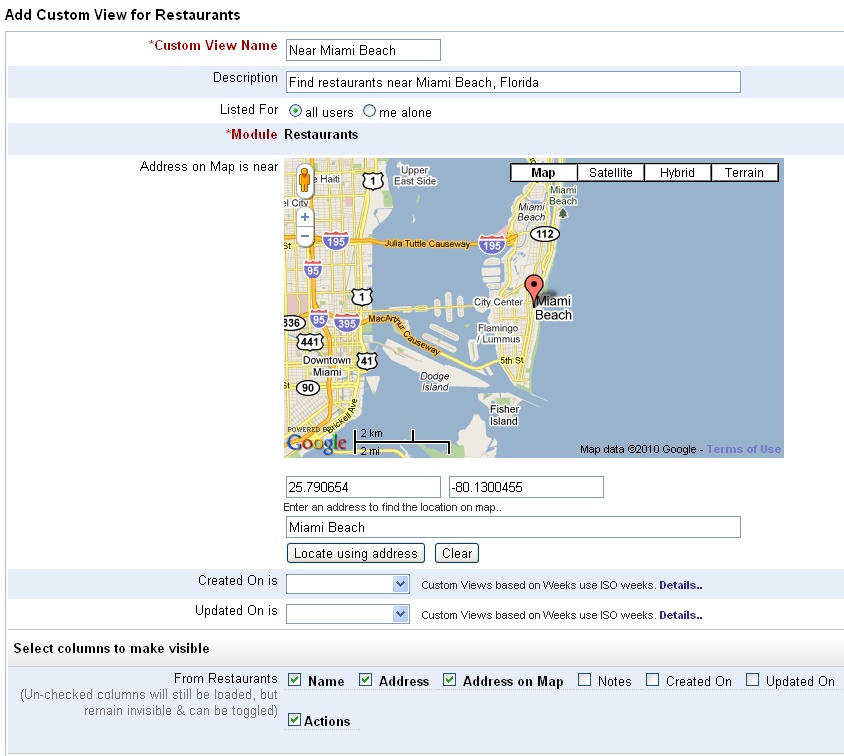
For example, following are the entries to create a custom view to find stores near Miami Beach, Florida..
One can provide an approximate address and automatically have the marker placed in that location. Also notice that I have modified the columns that are to be displayed in the list view.

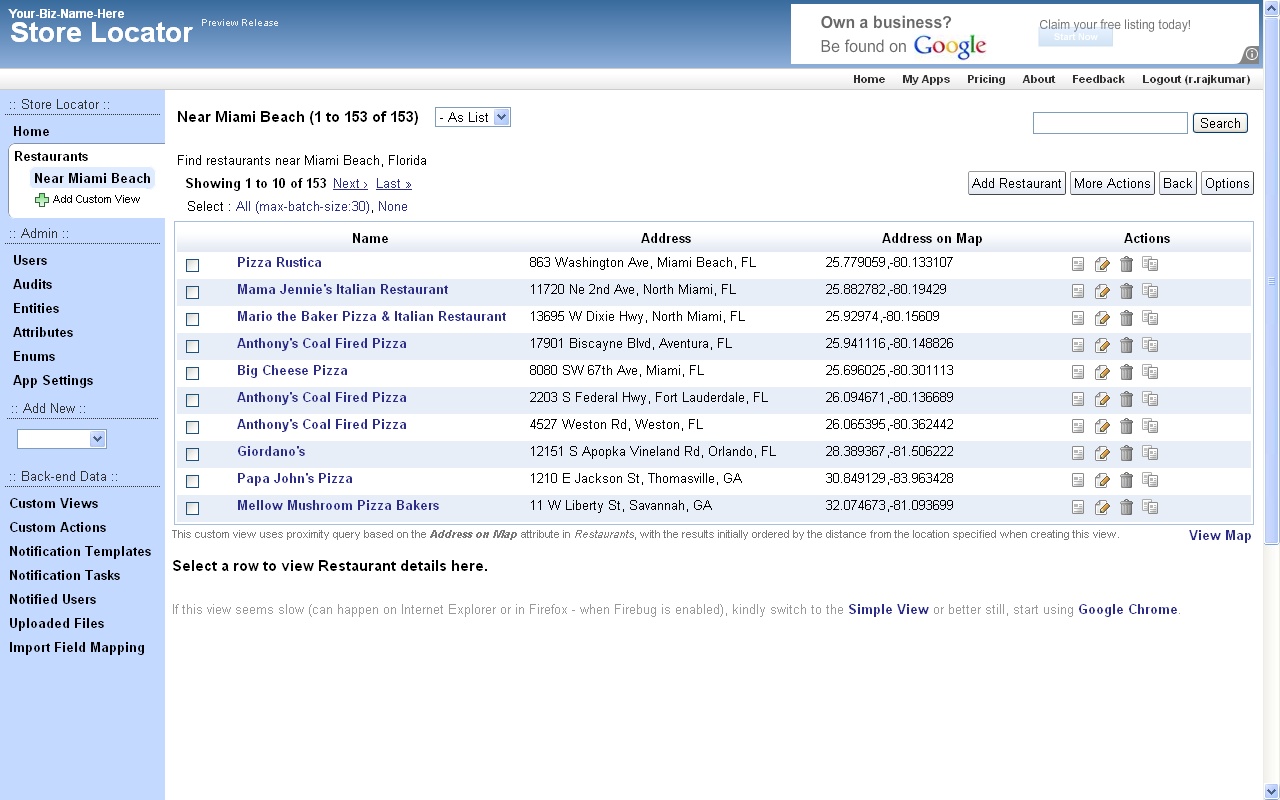
After saving the view, the resultant list view will be something like given below, with the records sorted based on the nearness to the location we specified when creating the custom view (that is, near Miami Beach, Florida)..


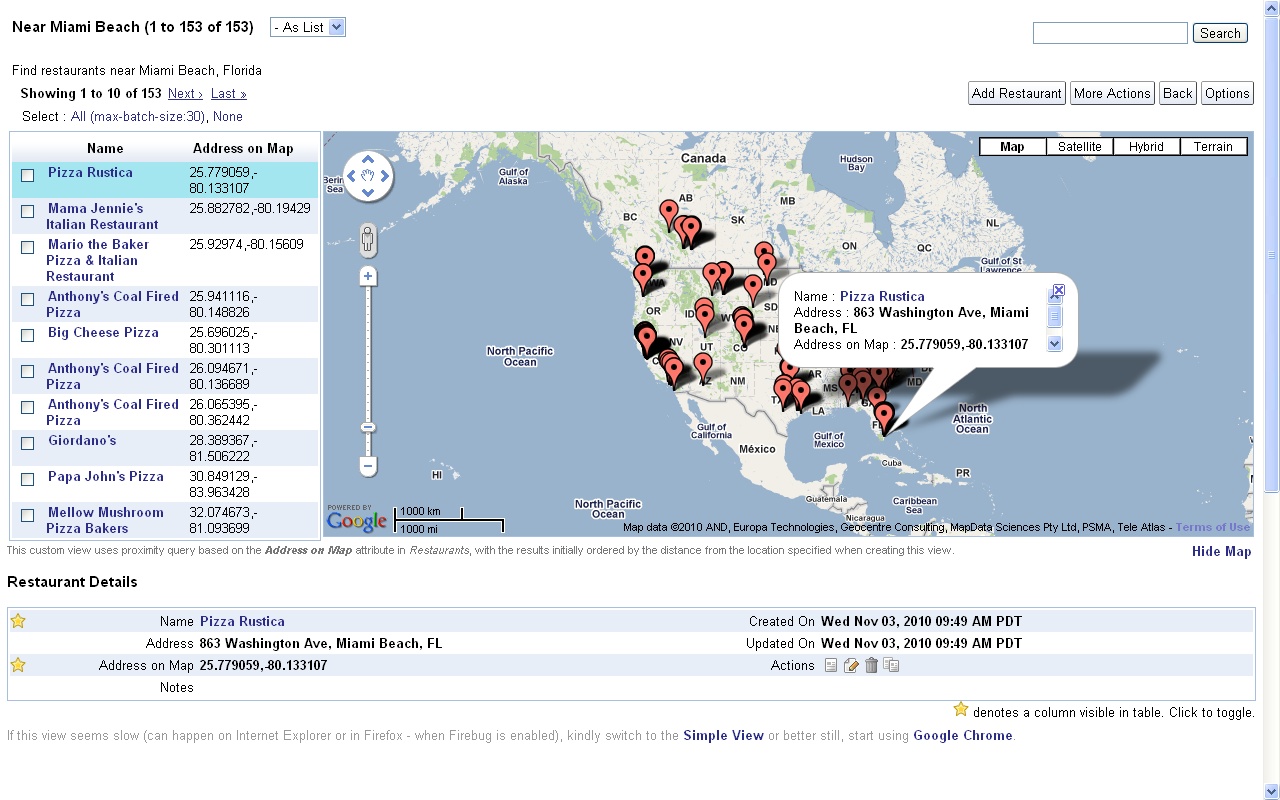
And the corresponding map view will be like the one given below..


You can also do a quick search without having to create a custom views, by following the links from the details page, to find other records near a particular location.

Hope you like the new geo-location and Google Maps integration features. Do let us know your feedback.

Wednesday, October 6, 2010

Custom Views now support Template Criteria for User References and Date/DateTime fields

There are some pre-created views in iFreeTools CRM like My Open Leads, My Open Cases and My Pending Tasks which lists the records, based on the user who is currently logged-in and accessing the application, showing only the records owned by them in that view.

While one can created Custom Views providing specific user references, there was no way to create a view with such dynamic values referring to the currently logged-in user.

Similarly, while there are pre-created views like Due Today, Due Tomorrow (in Tasks module), which lists the records based on the when the view is getting accessed. Until now, it was not possible to create such views using the Custom Views in iFreeTools.

But now, we have now added support for using dynamic filtering criteria values in Custom Views, for User reference attributes and date, date-time attributes.

Dynamic User-reference values in Custom Views

While you still have options to choose specific user references, when adding Custom Views, you are now provided with an option to choose dynamic values, as shown in the image below..


Choosing the option adds the criteria as a template value - ${user}, referring to the currently logged in user..


This template criteria value will be replaced dynamically, when users access the Custom View.

Dynamic filtering for Date, DateTime fields using Custom Views

Until now we did not support date and date-time fields in Custom Views. This was due to certain limitations in the querying capabilities of Google App Engine. While the limitations remain, we have overcome them to enable you to create Custom Views providing dynamic criteria values for date, date-time fields.

You can now filter out records using on the following dynamic criteria values..
${today}, ${tomorrow},
${this_week}, ${last_week}, ${next_week},
${this_month}, ${last_month}, ${next_month},
${this_year}, ${last_year}, ${next_year}

as shown in the image below..

Here again, the template criteria value will be replaced dynamically, when users access the Custom View.

This date/date-time filtering feature in Custom Views internally uses indexes for querying the data. These indexes for database records are something like an index in books, helping you find the required records.

While new data will be automatically indexed, existing data has to be updated at least once, so that the records can be indexed automatically.

One can trigger indexing from the list views by selecting one or more records and then clicking on More Actions > Re-Index.

Hope you like the new template-criteria based Custom Views.

There are no upper limits on the number of Custom Views one can add to our GAE(Google App Engine)-hosted Free CRM for Google Apps and to our GAE-hosted Online Database App Builder. So, feel free to add as many views as you would like and do send in your suggestions on how you think the apps can be enhanced to make it even more useful.

Would you like to have iFreeTools deployed onto your Google App Engine account? Yes, we offer custom deployment options, starting at $99/year for upto 25 users, enabling you to use the free quota (1 GB of storage and 2000 emails/day) offered by Google and to buy more resources as per requirements, directly from Google. Contact raj@sahasvat.com for more details.
Tuesday, September 28, 2010

Easy bulk addition of database records in iFreeTools CRM & Creator

Apart from the existing support for importing data in bulk using CSV files, we have now enabled support for bulk-addition of database records directly within our online apps.

From the list views (under More Actions) and from the details views (for adding Related Records), you will now find an option to add multiple entries of the records. Using this you can easily enter details for multiple database records in a single page and then save them all at once.

The form for adding multiple entries will be like the one given below..


In the above screen capture, multiple tasks are being added for a lead. By default the attributes which are marked as requiring a value along with a few other attributes are made visible in the form. One can change the attributes listed in the form by clicking on the Show/Hide Attributes link on the top-right.

When adding new rows, the values from the first row will be copied. So you can set the defaults in the first row and then have them copied to the new entries. You may also remove entries from the form, before you save them to database.

Once the details are added to the database, you can return back to the page from where you came to this form and see the records you had just added.

This feature is available in both the Free CRM for Google Apps and the Free Online Database Builder for Google Apps.

Hope you like our new feature. Feel free to send in your suggestions.

Private deployment of iFreeTools into your own Google App Engine account starts at $99/year for upto 25 users. For unlimited users it is just $299/year. Additional customizations are optional and are billed at Indian rates. If you are interested in such a private deployment, contact raj@sahasvat.com.

Wednesday, September 1, 2010

Image fields now supported in the Free Online Database builder for Google Apps

We have now added support for defining and using Image fields in iFreeTools. This has been enabled for the Products database in iFreeTools CRM and can also be used for your custom online databases, using iFreeTools Creator.

A sample view of such a database listing is given below in a snapshot of a Travel Desk application built using iFreeTools Creator. The thumbnails of the images are listed in this table view..


When you proceed to the individual record's details page, you can see a bigger image..


When adding/editing records, you have options to either upload a new image or using an already uploaded image from the database of uploaded files. The options available for editing the image fields are show in this below image..


All uploaded files can be managed easily from Back-end Data > Uploaded Files, where CSV files used in importing data are also listed..


You could rename the files and change the descriptions or even, download the file from the details page..


When adding/editing the attribute you could specify the maximum file size for the image. For free versions the options available are 10, 25, 50 and 75 (all sizes in KB). If the uploaded image is of bigger size, the app will try to resize and reduce the file size to confirm to your settings..


You can go in for bigger image sizes when we open up our paid plans or if you go in for our custom deployment options, which enables you to use the 1 GB free quota from Google and to purchase additional resources directly from Google at $0.15/GB/month.

The rates for custom deployments start at $99/year (works out to $8.25/month) for upto 25 users (or $0.33/user/month). For unlimited users, it is just $299/year.

Hope you like our new feature. Do feel free to send in your suggestions using the feedback form in our apps or directly via mail to raj@sahasvat.com